Author Archives: Balasoundari

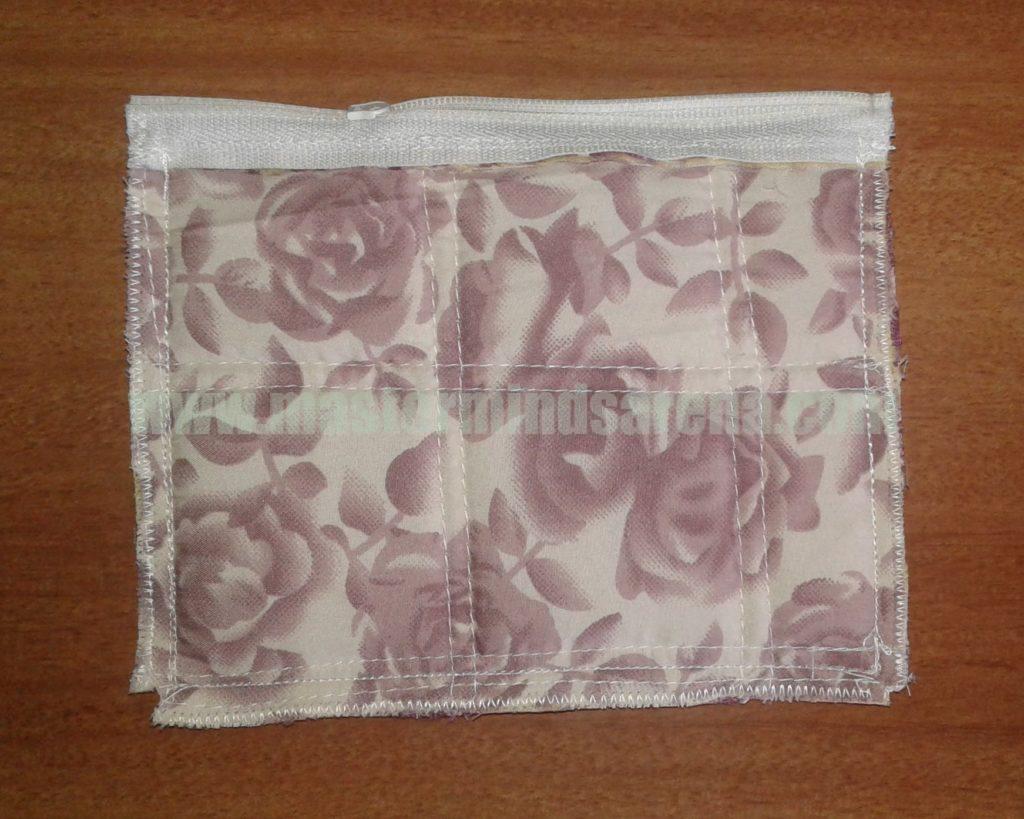
Easy Quilted Zip Purse

Hope you have all enjoyed my previous post, Quilting.

Let us make some zip purses from the quilted fabric.

Easy quilted Zip purse

Materials Needed:

Materials Needed

1. Quilted fabric. 

2. 9″ zip.

To know about quilting, visit this link, Quilting in Fabric

Tutorial

Measurements:

Measurements

Cut down 2 pieces of the above dimensions from the quilted fabric. You can vary the measurements as you like.

Step 1:

Step 1 – Stitching zip to one fabric

Place the zip and one of the pieces, right sides together as shown above. Make sure you align the top edges (on the 6 1/2 ” side) and stitch along the bold line.

Step 2:

Step 2 – Top stitch

Turn the zip and top stitch.

Step 3:

Step 3 – Aligning the stitched zip to the other fabric

Place the stitched fabric with zip, on the other piece, right sides together, as shown above.

Step 4:

Step 4 – Stitching the other edge of zip

You can pin the pieces and stitch the other edge of zip along the bold line.

Step 5:

Step 5 – Top stitch on the other side

Now, open up the fabric and top stitch on the other side.

Step 6:

Step 6 – Hand sew the zip opening

Move the zip runner between the two pieces and hand sew the opening. Cut the extra zip. This will ease up the stitching on the sides.

Step 7:

Step 7 – Sewing the sides on the inside

Open the zip halfway. Fold the fabrics in such a way, the right sides of the outer fabric face each other. Stitch along the bold line with zip on top.

Stop the stitches just near the zipper teeth. This will give a neat look to the corners.

Step 8:

Step 8 – Clip the corners and do a zigzag stitch

Your purse is almost over.

Clip the corners. You could leave it as it is, or you could do a zigzag stitch as shown above.

Step 9:

Fully completed Quilted Zip Purse

Turn the purse inside out and push the corners.

Your zip purse is ready!!

I have attached a knotted tassel to the zip and also finished some purses in various sizes (some with bias binding)….!

Other purses


Share this post:

Grasshopper – Eyprepocnemis

Grasshoppers are solitary insects. They are the oldest chewing herbivorous insects having strong hind legs. The young ones are commonly called hoppers. They make sounds by rubbing their hind legs with wings.

Grasshopper – Eyprepocnemis

This grasshopper may belong to the Sub – family Eyprepocnemidinae, and the Genus Eyprepocnemis.

The genus Eyprepocnemis is described by the German Botanist and Entomologist Franz Xaver Fieber around the year 1853.

He was born on 1 March 1807, in Prague. He was a member of The National Academy of Germany. He studied the insects in the Order – Orthoptera & Hemiptera and also contributed several publications. He died on 22 February 1872, in Chrudim.

Grasshopper – Genus Eyprepocnemis

These species have a broad black band in the center along with two long stripes on the sides. The stripes may be in pale brown.

The head is slightly slanted with mouth at the bottom.

They have compound eyes, which enables them to see all sides.

The wings have brown spots.

They have short and stout antennae , hence they are commonly referred as short – horned grasshoppers.

They also have a hearing organ on the side of the first abdominal segment (the body part), just where the hind legs is attached to the body. It is a thin membrane which sends signals according to the sound vibrations. On closer observation, we can see it.

Grasshopper – Eyprepocnemis – side view

The characteristic feature of the grasshoppers – the hind legs, are slightly bluish grey in colour. 

While we speak about grasshoppers, it is also interesting to know about Locusts.

Some grasshoppers in the FamilyAcrididae (short – horned grasshoppers) change their behavior in dense population under certain circumstances forming a group called swarm. These swarming grasshoppers are known as Locusts.

This transformation from grasshoppers to locusts is caused by the secretion of certain hormones. This usually occurs when there is a new green vegetation after a period of drought. This is referred to as the migratory phase or gregarious phase.

First, the nymphs (young ones) form the swarm, growing into a much stronger locusts with modifications in their body, which helps them to hover in the air for a long time.

Below are some common differences between these two insects.

Grasshopper Locust
They live separately. They live in groups.
The wings are wide, so they can fly over short distance only. The wings grows long and strong. So, they can fly over longer distances.
They eat at a normal rate, causing less harm to plants. They eat vigorously destroying every green plant in sight.
They can live in one place for a long period of time. They migrate from one place to another.
They can be seen in green, brown or sometimes in bright colours. As the nymphs grow, their original colour changes.
They reproduce normally They reproduce at an increased rate, forming a more larger group.

Millions of locusts destroying a vast area of farm land is referred as ‘plague’.

Share this post:

Quilting – Basics

Quilting is an old traditional form of stitch. In those days, the quilt is hand made. Even now, we can see hand sewn quilts, in some places all over the world. In India, the traditional quilts are still practiced. 

Quilting is used for binding two or more fabrics.This gives a firm shape to the material and also soft & smooth finishing.

A basic quilt is made by stitching different repeated geometric shapes using straight lines (Running stitch). Free motion quilting in sewing machines is more popular now, using various designs and curves.

A Quilt normally has 3 layers,

  • Top Layer (Outer Main Fabric)
  • Middle Layer (Batting / Interfacing)
  • Bottom Layer (Inner Fabric)

The top layer is the main fabric in which the quilting is done. It can be a single piece of cloth or many fabric scraps sewn together.

Let us learn simple machine quilting on fabric. This quilted fabric can be used for making different kinds of purses, bags, cushions, pillow – covers, bed – covers, garments and decorative wall hangings.

Materials Needed:

Materials Needed

Main Fabric (Top Layer)

   – Single piece of fabric as per required

Foam sheet / Sponge sheet (Middle Layer)

   – I used 6 mm sponge

Non – Woven fabric (Bottom Layer)

   – We can also use fabric or Gaada cloth

Thread – Same or contrast colour of fabric

Tutorial

Step 1:

Aligning the fabrics

When quilting on the main fabric, the inner fabric may shrink a little. To avoid this, cut the non – woven or the inner fabric 1/2 ” or 1 ” extra, as shown above.

Place the main fabric, right side up, foam sheet in the middle and the inner fabric right side down. Foam is in between the two fabrics (Refer image above).

Now the whole picture will look like below.

Fabric – Ready for quilting

Pin all the sides.

Step 2:

Drawing lines

Draw lines using scale and fabric marker (chalk / crayon). I have drawn diagonal lines.

You can mark horizontal, vertical, diagonal lines or any other design.

Step 3:

Start the stitching from one corner of the fabric.

Always stitch the lines in the same direction.

Back stitch at both the ends of each line.

After quilting one side of diagonal lines, tilt your fabric and start quilting from the other side to get the diamond shape.

Step 4:

Trim all sides

This is the fabric, after quilting.

Trim on all sides.

Quilted Fabric

Now, your quilted fabric is ready!!

Back side of the quilted fabric

Share this post:

The Orb Weaver – A Study

It was in the month of May, I saw this little insect outside my window. It is a spider. I was fascinated to see the spider spinning its web, right in front of my eyes. The web was also clearly visible.

Spider – Argiope pulchella

The common name for this type of Spider is Cross Spider.

Hope you would have understood, why the name came, by seeing the image above. Yes!! Since it keeps its legs like a cross in the web (like an X), So the name cross spider.

The head (upper part) of the spider is covered with silver hairs. Hence the scientific name, Argiope pulchella.
Argiope comes from the Latin word,argentum meaning silver.

The Swedish Arachnologist, Tord Tamerlan Teodor Thorell had described these species around the year 1881.

He was born in Gothenburg on 3 May 1830. During his lifetime, he had researched more than 1000 species of spiders. His works are On European Spiders (1869) and Synonym of European Spiders (1870-73). He passed away in Helsingborg on 22 December 1901.

Spider Web at Night – Argiope pulchella

The species is commonly called Orb – Weaver Spiders or Orb web spiders. Orb is an old English word for circle.These spiders have the ability to build a circular wheel shaped web.

They are seen all over India, China and Indonesia.

The spider never gets tired to built its web again & again, even after heavy rain and strong wind, it was still there spinning the web!!

The web in the concentric circular shape – Argiope pulchella

They make a thick zig-zag pattern around the center of the web on four corners like an X. This is called stabilimentum or web decoration. The spider then rests in the center, aligning its pair of legs to each corner of the pattern.

This is a specialty of the Argiope species. The real reason behind this decoration is still unknown. It might be to attract the prey or to scare away some predators.

Argiope pulchella – Zig-zag pattern and Egg sac

The egg sac took around 15 days for the baby spiders to hatch. These are called spiderlings.

After laying the eggs, the abdomen of the spider becomes thin. But in about 10 days, it becomes bulk again, ready to built another sac. It sounds weird, but that’s the fact.

This spider totally built 3 egg sacs. Each sac, usually contains thousands of eggs.

Spiderlings – Argiope pulchella

The spider always builds the egg sac at night. Even the spiderlings hatched at night. I saw this early morning.

When an insect gets stuck in the web, the spider rapidly attacks it, rolls the prey into a ball by covering it, with a new spin of web. Later the spider would eat it. These are harmless to humans.

These spiders have pentagonal (Five sides) abdomen (opisthosoma). All the pictures above shows the ventral view (back side of the spider). Unfortunately, I don’t have any dorsal side(front side) view.

Along with this study, it teaches us a lesson.

NEVER GIVE UP!! AND…

IF YOU ARE IN A WEB;

BE A SPIDER!! NOT THE PREY!!

Share this post:

Fabric Card Holder Sewing Tutorial with Pictures

This is a beginner sewing project for ladies.

Everyone have their own credit cards, ATM cards, ID cards or any visiting cards. So, lets make a small pouch to keep those cards safely.

It is handy to use in a clutch or handbag.

This would make a good photo tutorial, easy to follow and sew!

Materials Needed:
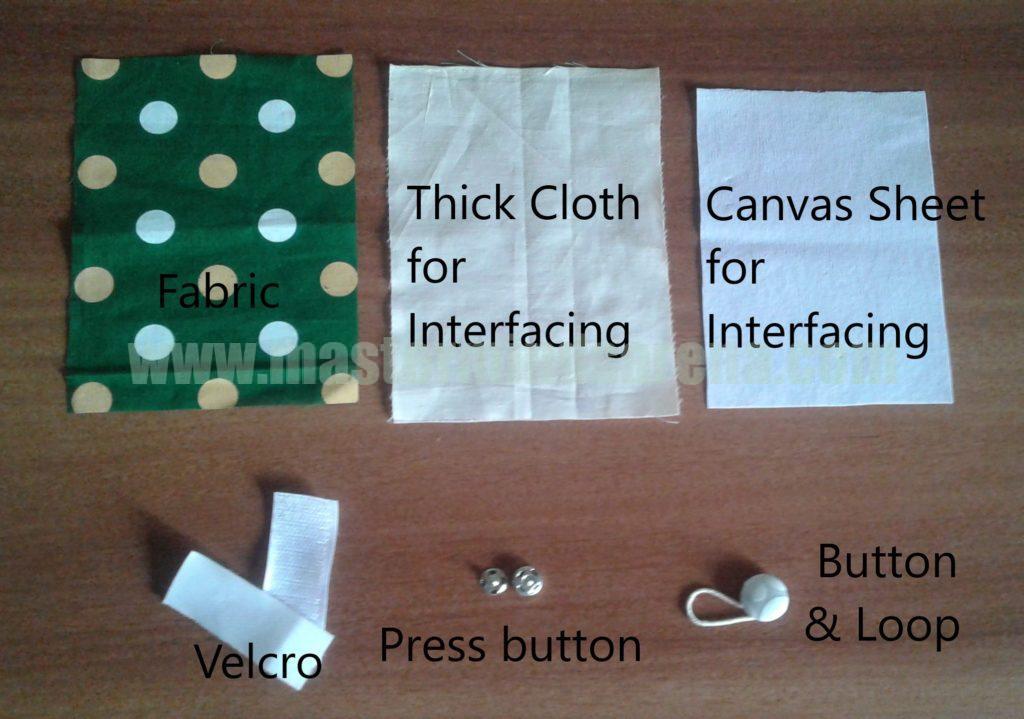
Materials Needed

Fabric ( Cotton is preferable)

For Interfacing:

1.Thick cloth (Gaada cloth)

2.Canvas sheet (Collar sheet)

For Closure:

Velcro (2 1/2 ”)

Matching thread , scissor and sewing machine

Tutorial

Measurements:

First, let us cut the measurements in a chart or cardboard. Use that chart pattern to cut the fabric. Refer the image below.
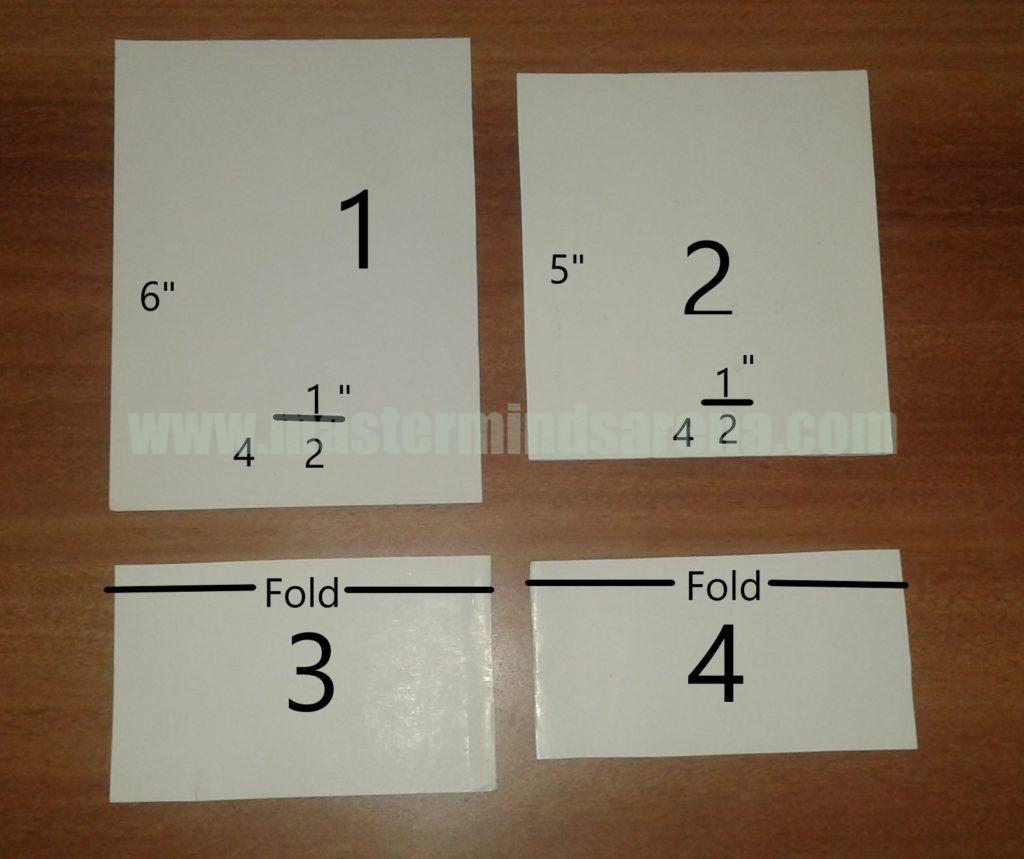
Measurements

 1. Outer Fabric – cut 1 piece

     Interfacing – cut 1 piece

     Height = 6”

     Width = 4 1/2

2. Inner Fabric – cut 1 piece

    Decrease the height by 1”.

    Height = 5”

    Width = 4 1/2

3. & 4. Two fabric pieces for pockets.

   When cutting fabric for the pockets, make sure you fold the fabric as shown in the chart above and then take the measurements.

 3. Pocket 1 (Big pocket)

     Fabric – cut 1 piece (Top – fold)

     Interfacing – cut 1 piece

     Width = 4 1/2 ”

     Height = 2 3/4

 4. Pocket 2 (Small pocket)

     Fabric – cut 1 piece (Top – fold)

     Interfacing – cut 1 piece

     Decrease the height by 1/2 ”

     Width = 41/2

     Height = 21/4

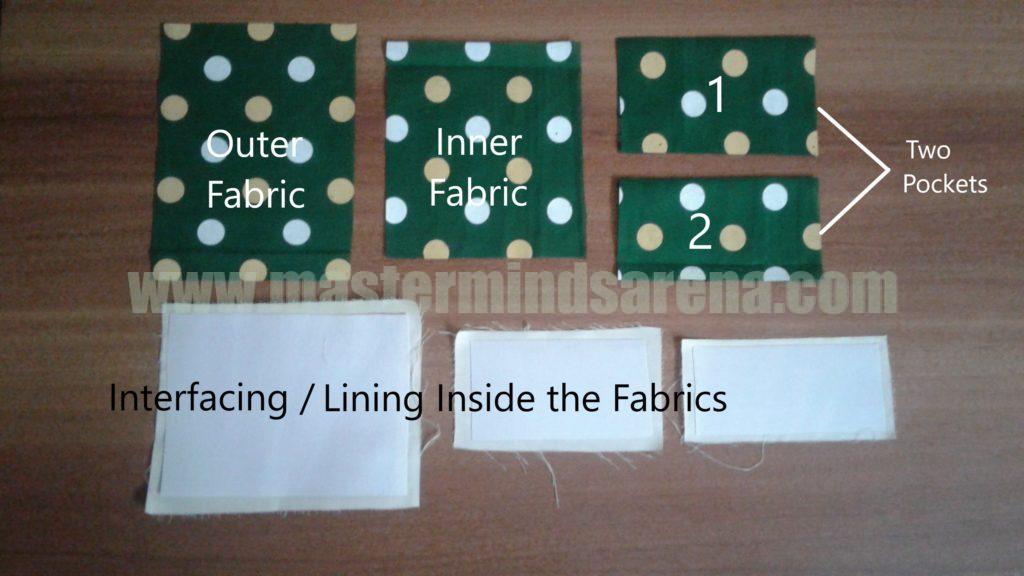
Fabric pieces

Note in the above pic, the top of the two pockets have been folded as mentioned before.

Cut the canvas sheet by 1/4” or 1/2 ” and iron them to the Gaada cloth as shown above.

Step 1:
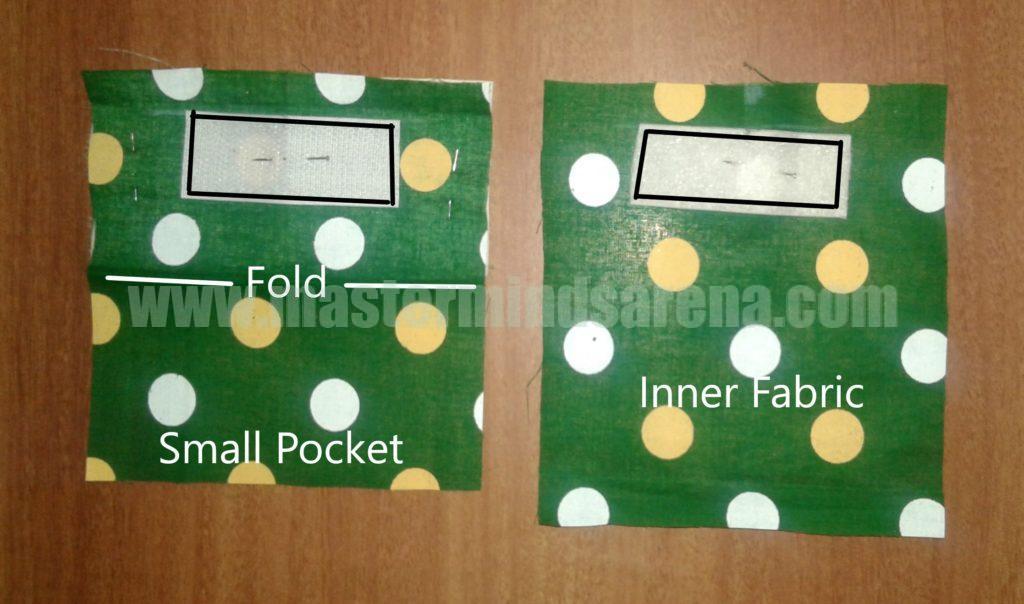
Step 1 – Attaching the velcro

Sew the velcro on the small (2nd )pocket to one side (not the folded side) leaving 3/4”

(the pocket is not folded in the above pic.)

Sew the velcro(soft side) to the inner fabric leaving a 3/4” from the top

Sewing lines are given in bold black.

Step 2:
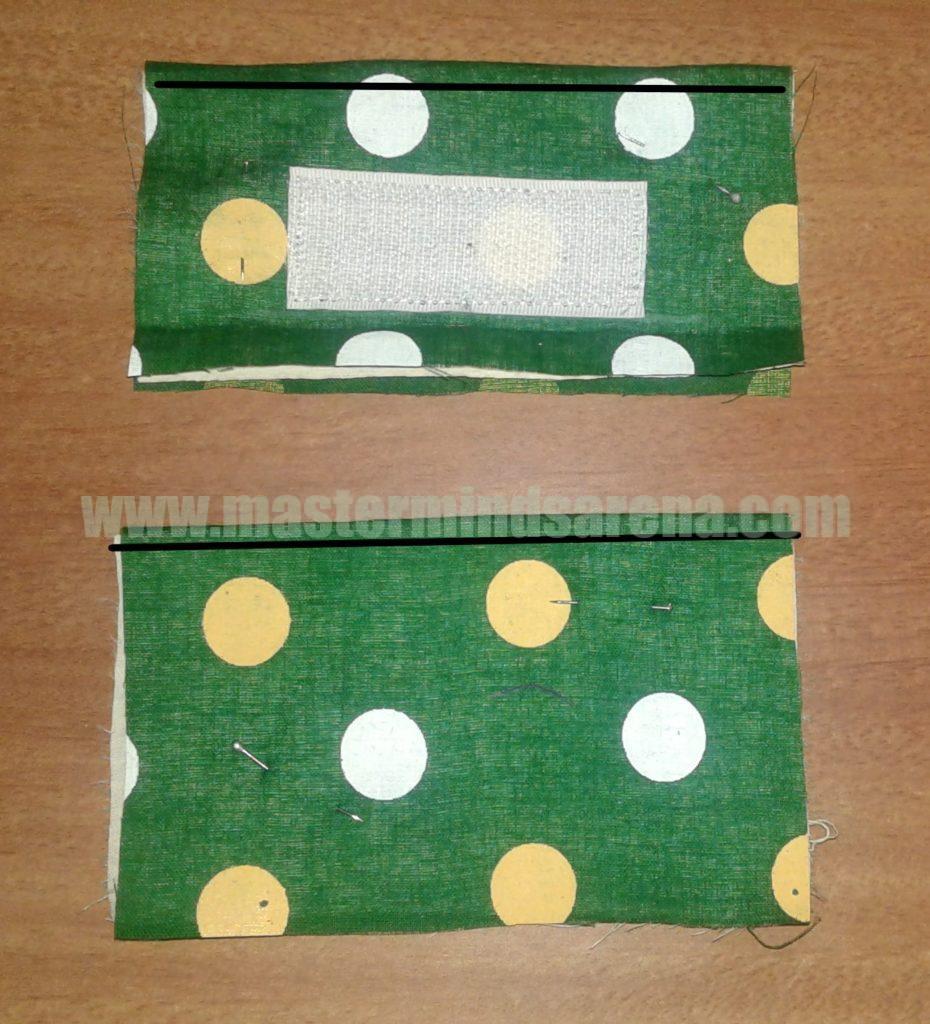
Step 2 – Top stitching the pockets

Keep the interfacing inside the pockets, fold and top stitch along the bold line.

Step 3:
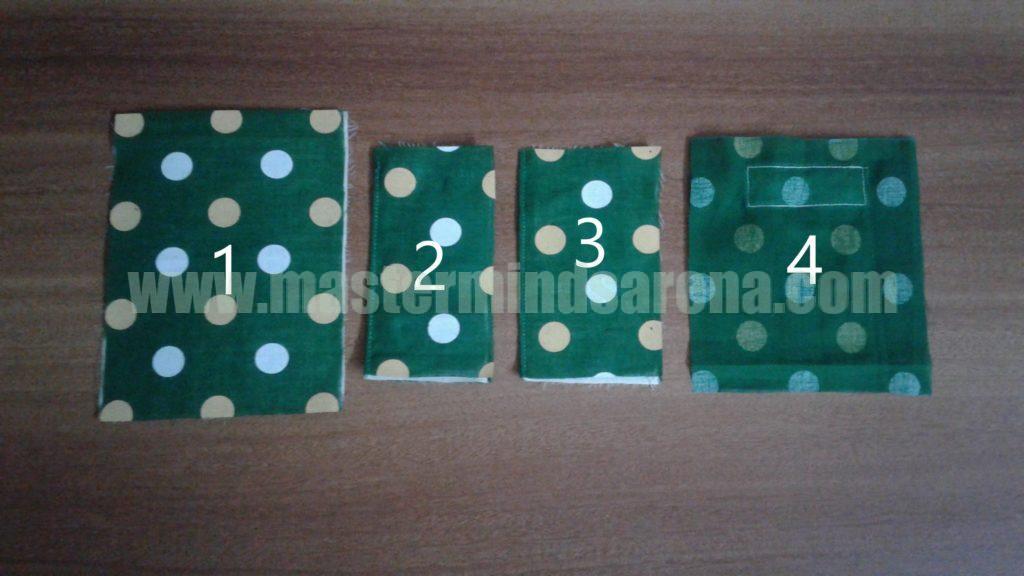
Step 3 – Aligning the fabrics

Align the fabrics as shown in the above order.

1.Keep the outer fabric right side up.

   The interfacing is kept below the outer fabric.

2.Keep the small pocket right side down ( Velcro side down).

3.Keep the bigger pocket right side down.

4.And the inner fabric right side down.

   The following images will now guide you through the process.

Step 4:
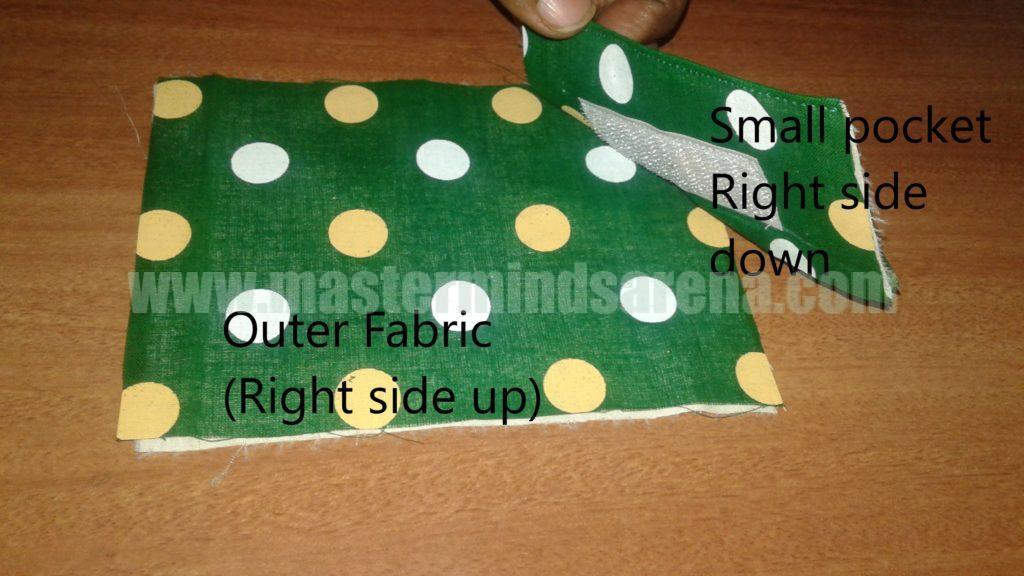
Step 4

Step 5:
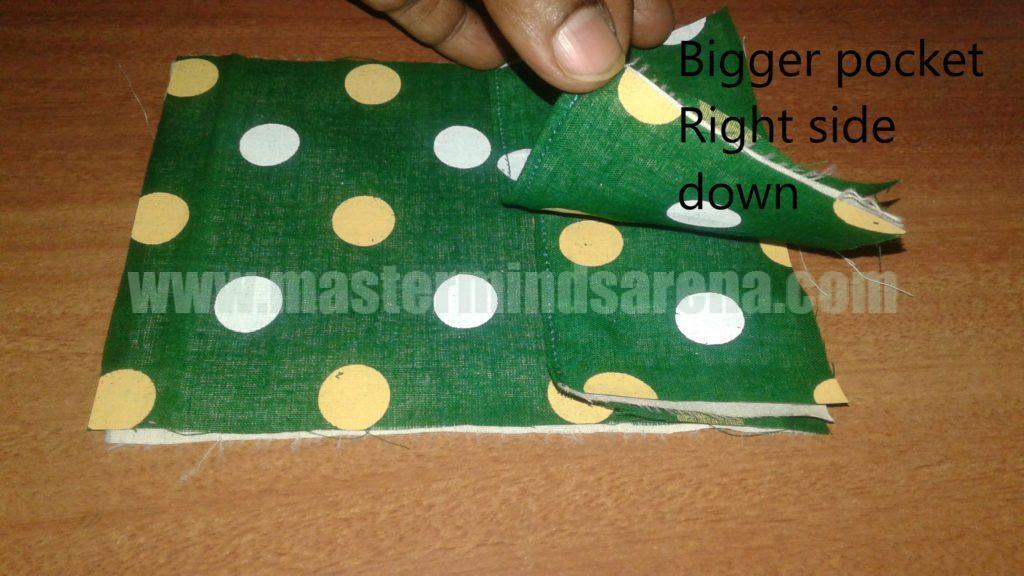
Step 5

Now the whole picture will look like below.

Make sure the base and the corners all match up.

The small pocket ( with the velcro) is not visible, it is inside the big pocket.
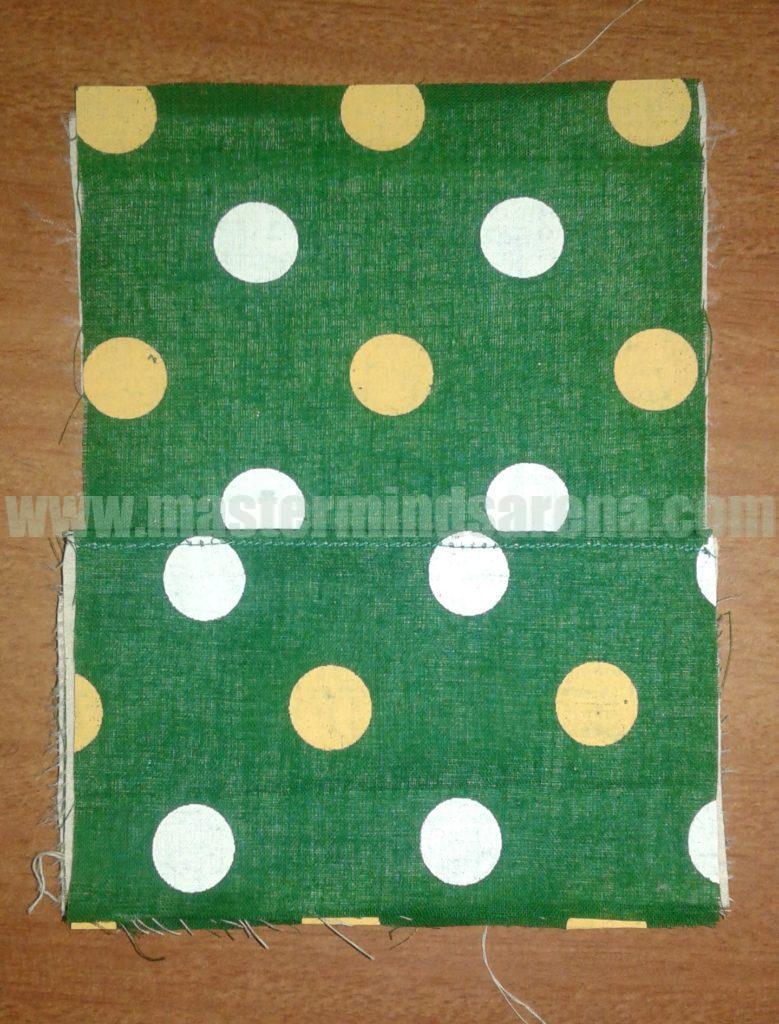
Step 5 – Outer fabric with two pockets

Step 6:
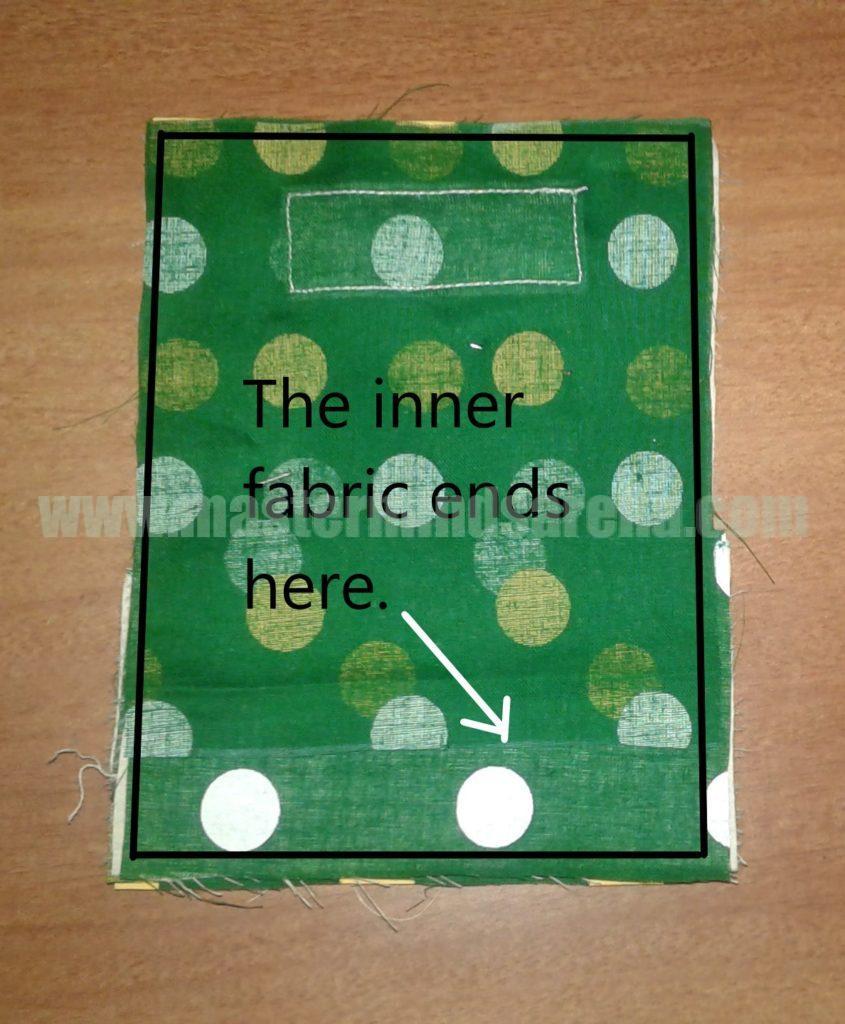
Step 6 – Sewing all sides

Now place the inner fabric right side down and stitch along the bold line.

I used a 1/4” seam allowance.

Note that the bottom of the inner fabric is above the stitch line, so we can turn it inside out through that gap.

Step 7:
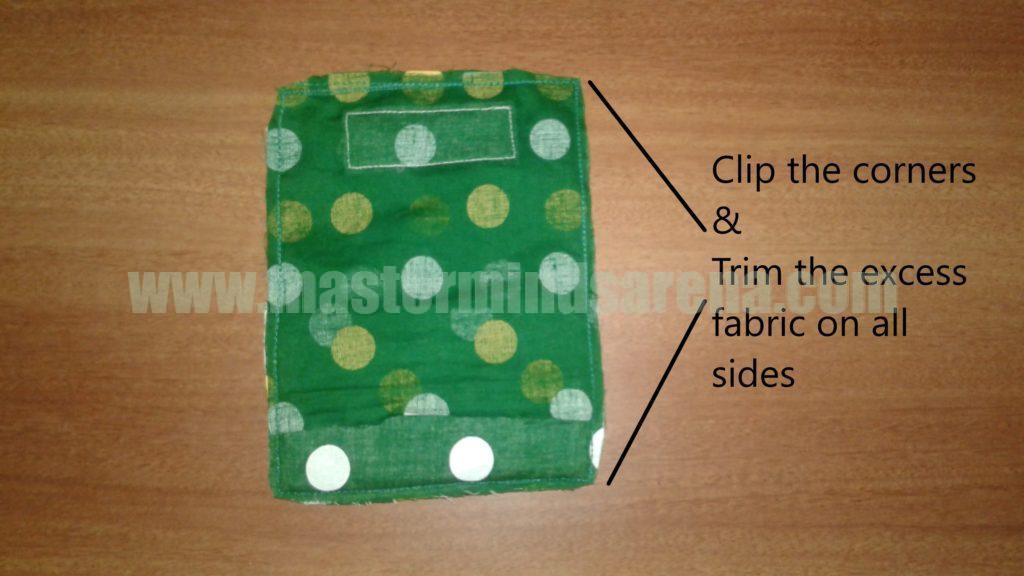
Step 7 – Clip corners

Step 8:

Now is the last step, turning each fabric inside out.

Follow the images.
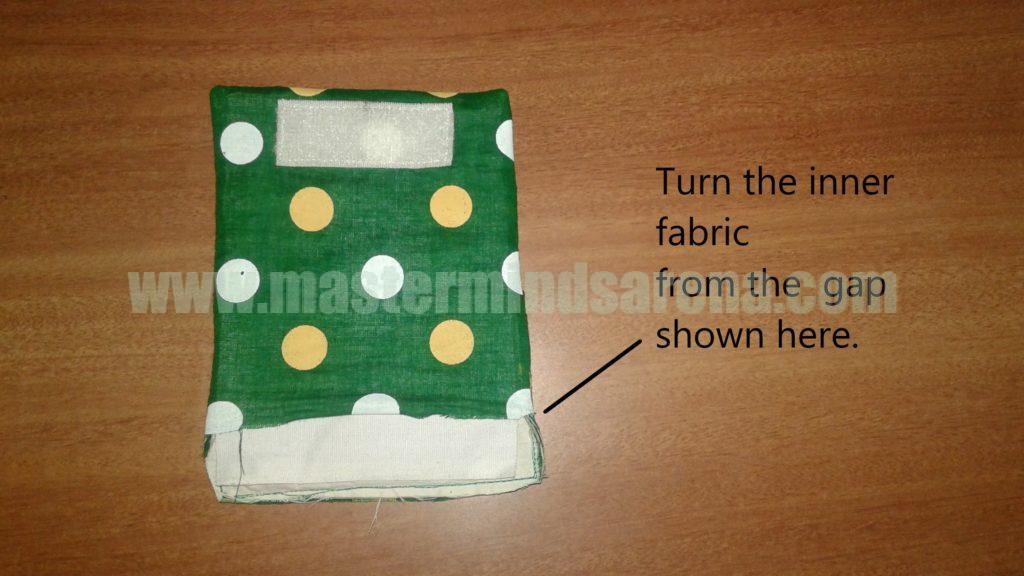
Step 8 – Turning the inner fabric
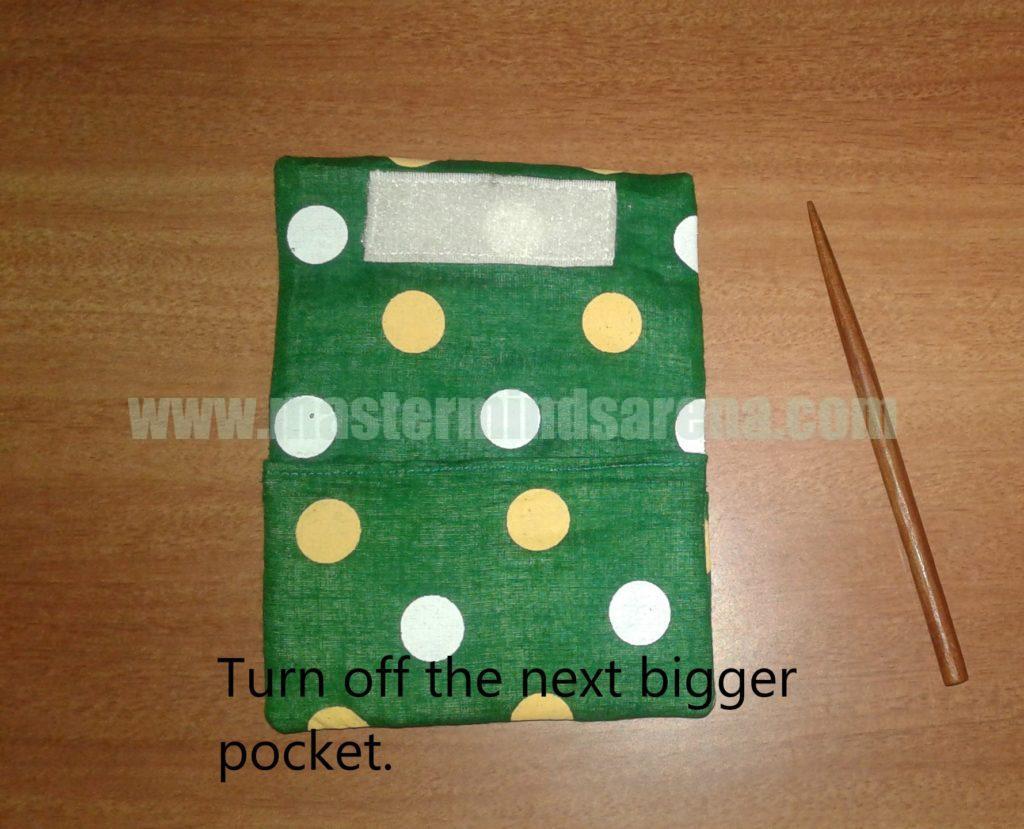
Step 8 – Turning the bigger pocket
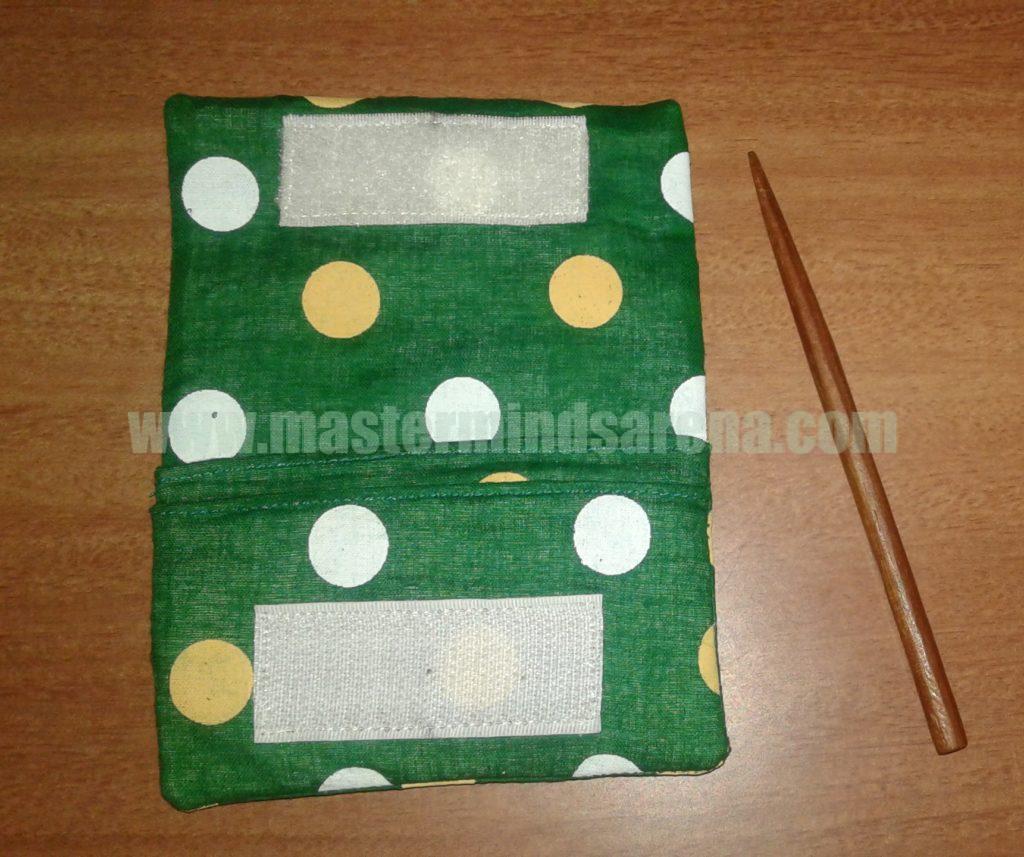
Step 8 – Turning the small pocket

Turn the last smaller pocket.

You could use a pointed tool to push out the corners.

Iron both the sides.
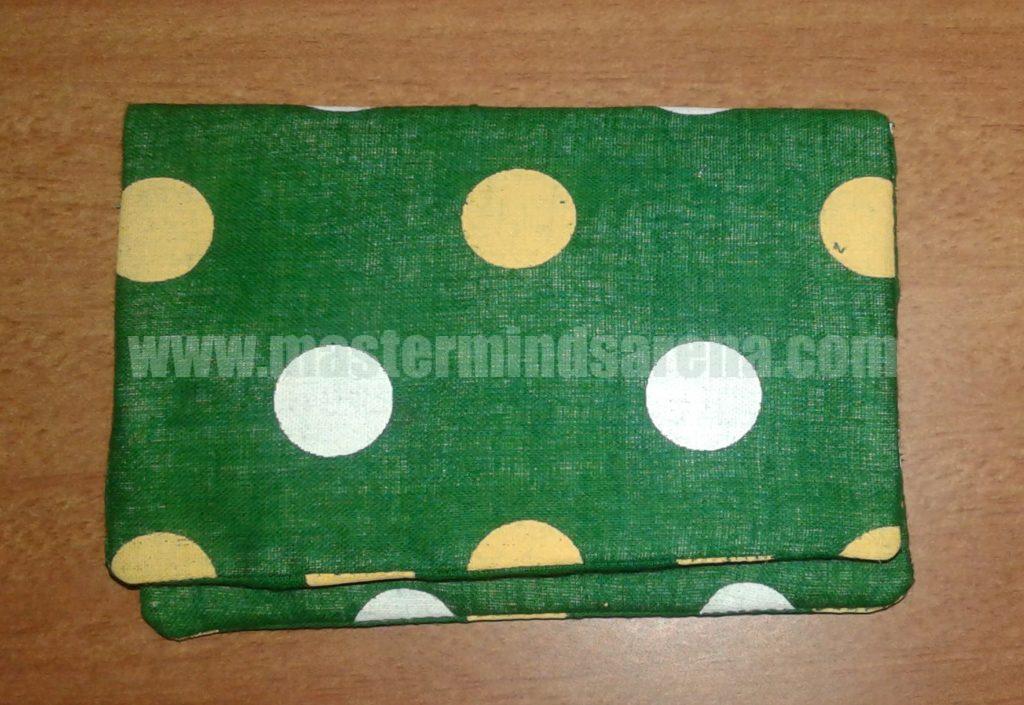
Fabric Card Holder – Front view

Your cute little card holder is now ready!!!

You could fit 2 or 3 cards in each pocket.

Note:

You can also use Foam Sheet (Sponge Sheet) for interfacing.

Other alternative options for Velcro are Press buttons or a button & loop

At last you can top stitch around the flap or not. Either way it will look fine.
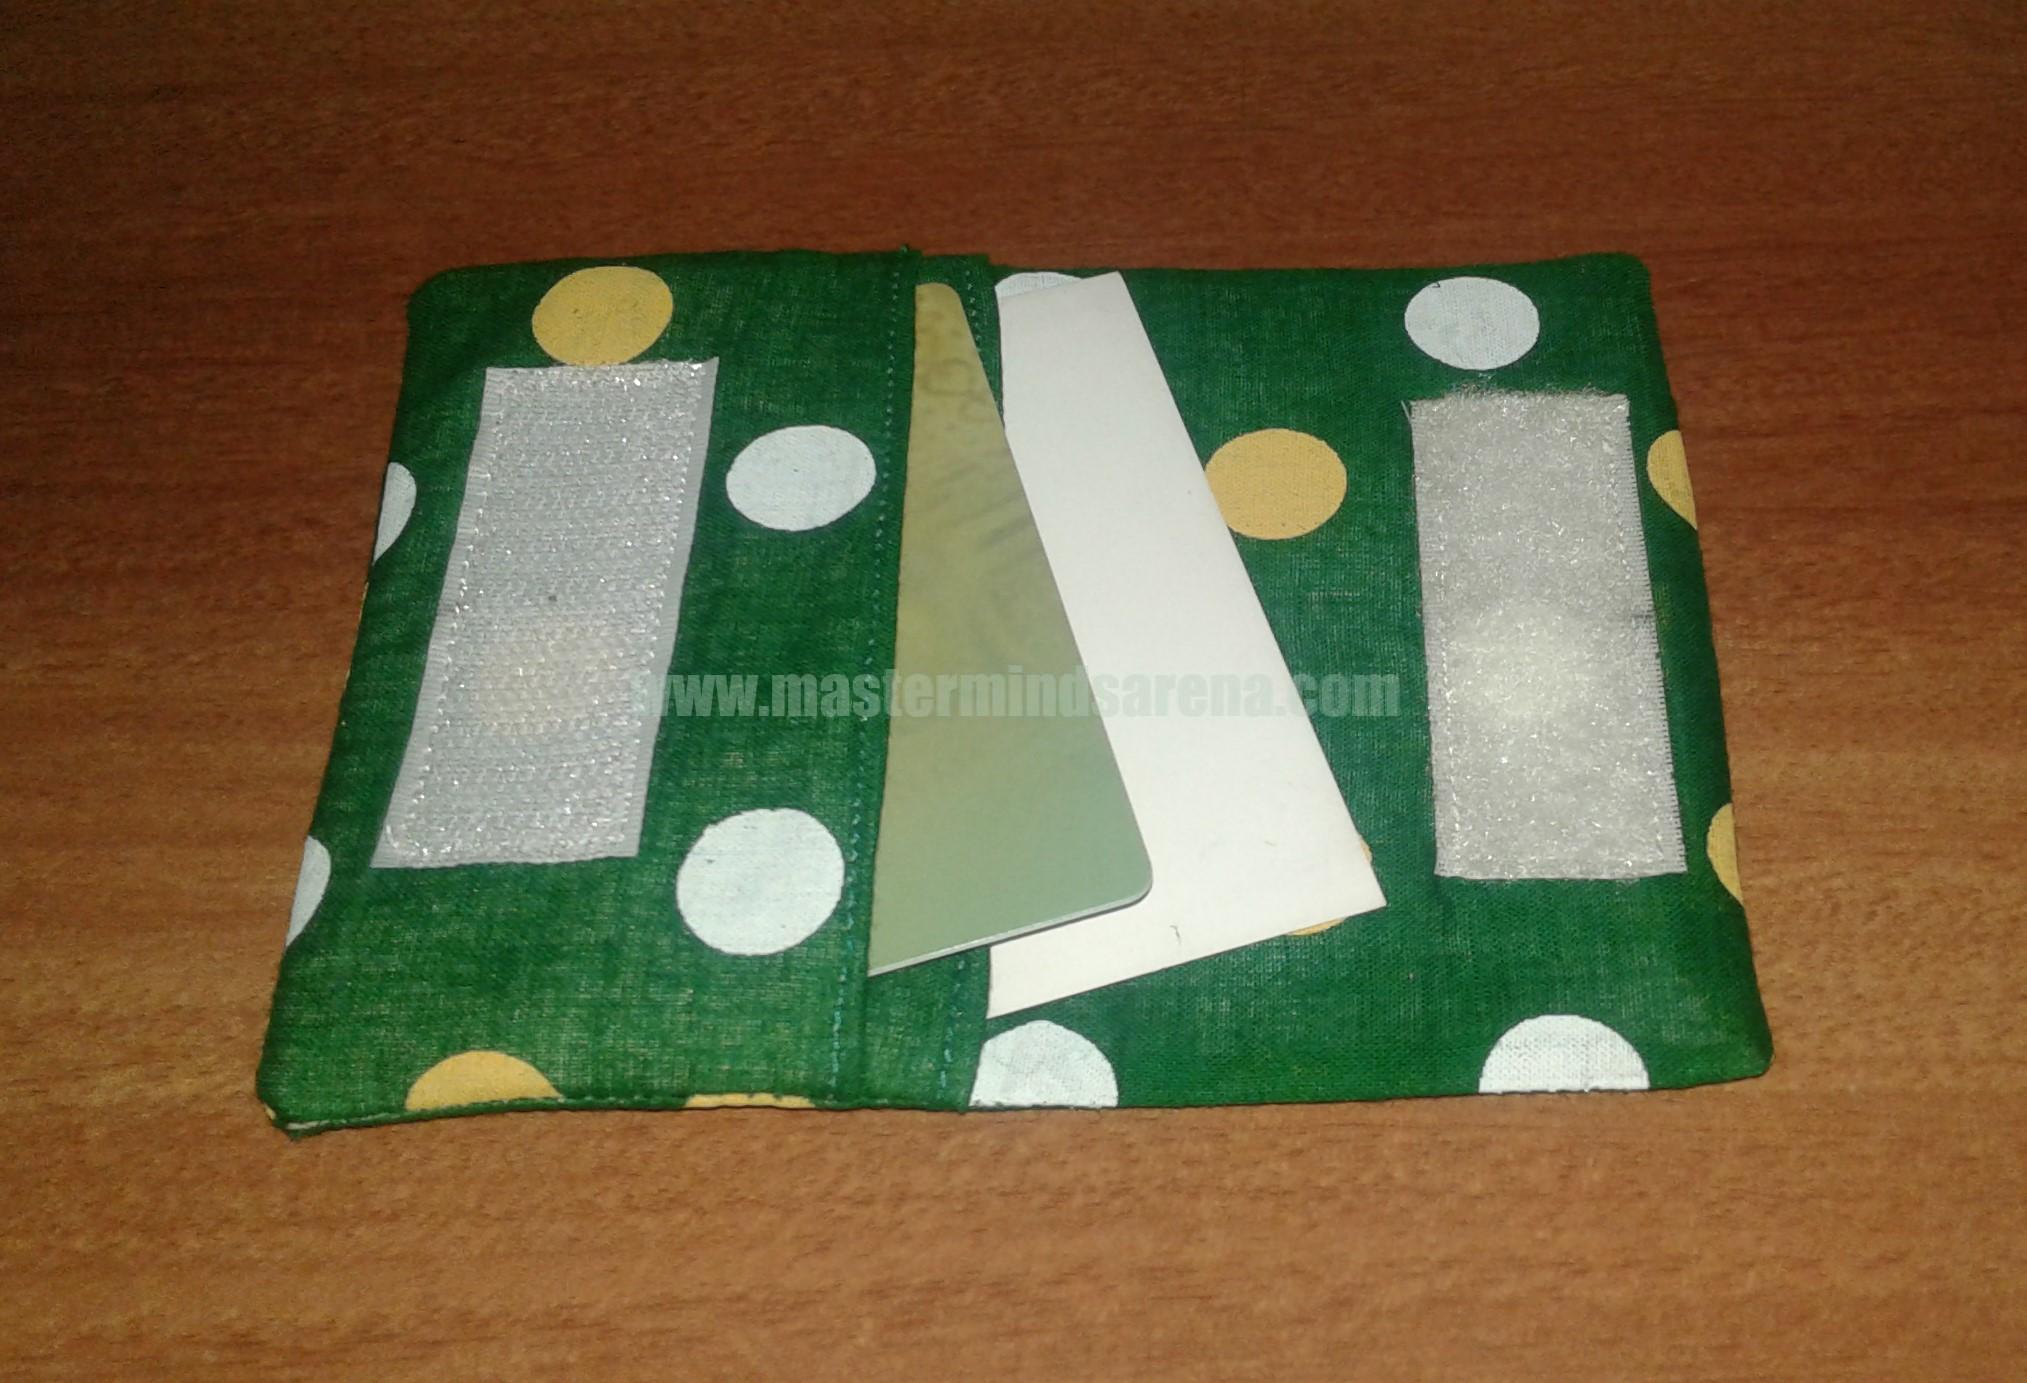
Fully Completed Fabric Card Holder

Share this post: